
Back in the 1970s, a layered dessert showed up at church potlucks and family reunions across America. It had a nutty crust, creamy filling, chocolate pudding, and whipped topping. People loved it so much they named it after the biggest heartthrob of the decade — Robert Redford. The funny part? Most people who make it today have no idea why it has that name. Here is everything worth knowing about this classic treat and how to make it at home.
How this dessert got its famous name
The 1970s were a big time for easy, make-ahead desserts. Instant pudding mixes and whipped topping had just become pantry staples, and home cooks were having a blast with layered treats. Around the same time, Robert Redford was one of the most popular movie stars in the world. He starred in hits like The Way We Were and Butch Cassidy and the Sundance Kid. Women everywhere had a crush on him, so when a dreamy dessert needed a name, the connection practically made itself.
One popular theory says the dessert was originally called “Better Than Sex” cake. When church groups wanted to include it in their fundraiser cookbooks, they needed a more polite name. “Next Best Thing to Robert Redford” did the trick. Everyone knew exactly which dessert it meant, and it kept things appropriate for the Ladies Aid Cookbook. Family Circle magazine featured the recipe in the late ’70s, and by the early 1980s, newspaper food writers across the country were sharing it with their readers.
This dessert has over 100 different names
Here is something wild. According to Southern Living, this same basic recipe goes by more than 100 different names. Some families call it Possum Pie. Others know it as Four-Layer Delight or Mississippi Mud Pie. In some kitchens, it is Chocolate Lush. There are even people who call it Jimmy Carter Cake. The name often depends on what part of the country someone grew up in or which church cookbook the recipe came from. Nobody can even agree on whether it is a pie, a cake, or a pudding.
The recipe also changes names when people swap out the pudding. Use lemon instant pudding and it becomes Lemon Lush. Use strawberry and suddenly it is Strawberry Lush. But no matter what anyone calls it, the basic idea stays the same — a baked nut crust on the bottom, a cream cheese layer, a pudding layer, and whipped topping on top. It is one of those recipes that every family thinks they invented. That is part of the charm. As one home cook put it, she grew up thinking Robert Redford was just the name of a great dessert.
What makes the four layers work together
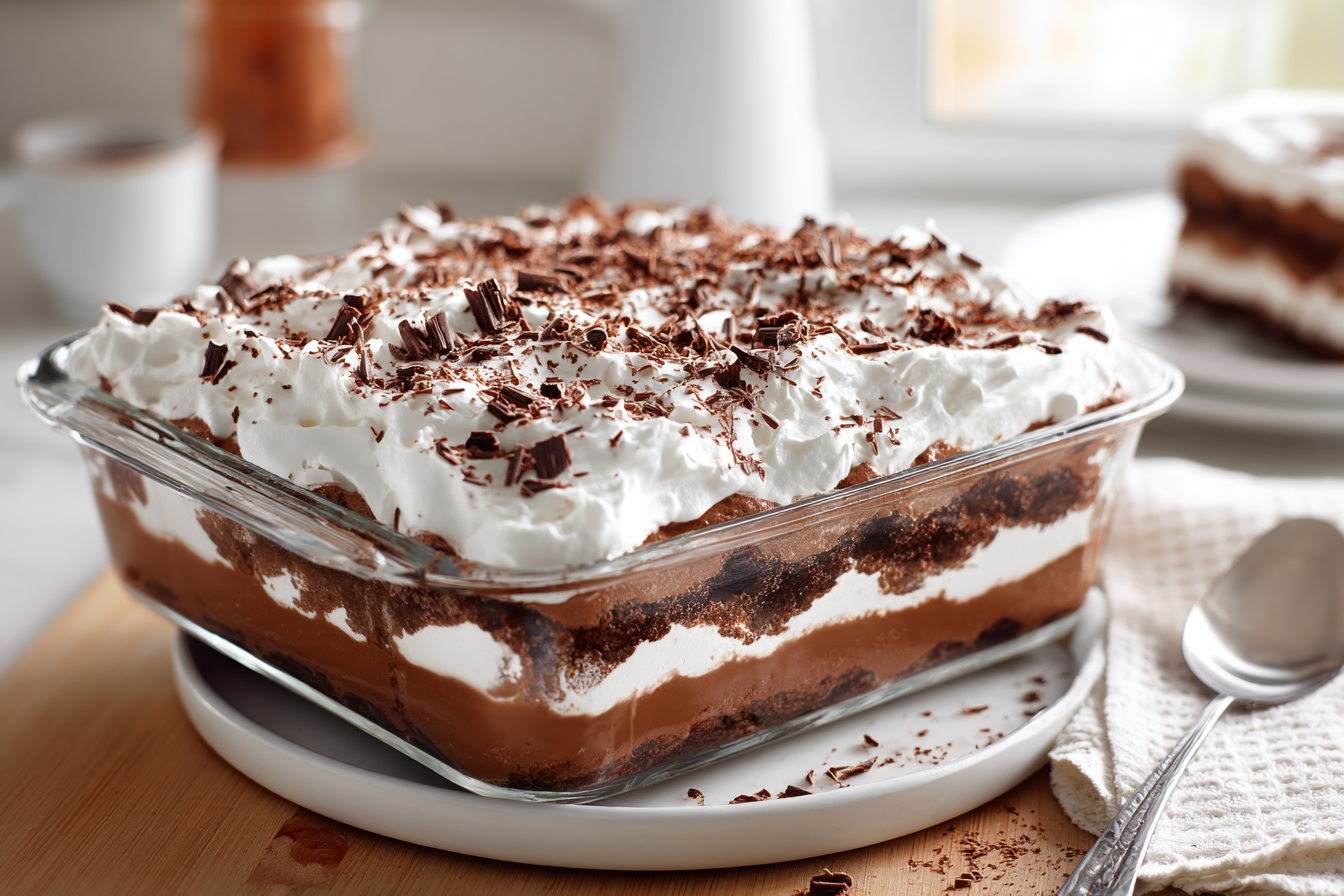
The magic of this dessert is how each layer does something different in every bite. The bottom crust is buttery and slightly crunchy from the chopped pecans or walnuts. It gives the whole thing a sturdy base. The cream cheese layer sits right on top and adds richness. Mixed with powdered sugar and whipped topping, it becomes light and smooth. Then comes the pudding — usually a mix of vanilla and chocolate fudge instant pudding whisked together with cold milk until thick.
The final layer is a generous spread of whipped topping. Cool Whip is the classic choice, though some bakers prefer homemade sweetened whipped cream for a more homemade feel. A sprinkle of chocolate shavings on top makes it look like something from a bakery. When all four layers come together and chill in the fridge for a few hours, each spoonful gives a perfect mix of crunch, cream, chocolate, and sweetness. It is the kind of dessert that makes people go back for seconds without even thinking about it.
The crust is what sets it apart
Most layered desserts use a graham cracker crust. This one does not. The shortbread-style nut crust is baked in the oven and it makes a huge difference. Combine all-purpose flour with melted butter and finely chopped pecans or walnuts, then press the mixture into a 9×13-inch pan. Bake it at 350 degrees until the edges turn golden brown. That takes about 20 to 25 minutes. The result is a slightly crumbly, toasty base that holds up under all those creamy layers without getting soggy.
Some people like a thick crust and actually double the crust recipe. Others prefer it thin so the filling takes center stage. Either way, let the crust cool completely before adding the cream cheese layer. If the crust is still warm, the cream cheese will melt and everything gets messy. Pecans are the traditional choice, but walnuts work just as well. One creative baker even swapped in toffee bits, which turned out to be a happy accident that tasted amazing. The crust really is the foundation, so do not rush it.
Powdered sugar matters in the cream cheese layer
Have you ever bitten into a dessert and felt a grainy crunch that was definitely not supposed to be there? That happens when granulated sugar does not fully dissolve into cream cheese. Using powdered sugar instead solves that problem completely. It blends smoothly into the softened cream cheese without any gritty bits left behind. Most versions of this recipe call for about one cup of powdered sugar mixed with an 8-ounce block of cream cheese and a splash of vanilla extract.
Once the cream cheese mixture is smooth, fold in one container of Cool Whip whipped topping. This lightens the whole layer and makes it fluffy instead of dense. An offset spatula works great for spreading it over the cooled crust. Little bits of the crust might try to come up as you spread, but do not worry about it. There are more layers going on top, so it does not need to look perfect. Some people use regular cream cheese while others use the one-third-less-fat Neufchatel version. Both work fine. The powdered sugar and whipped topping do the heavy lifting here.
Mixing two pudding flavors is the classic move
The traditional version of this dessert calls for one package of vanilla instant pudding and one package of chocolate fudge instant pudding, whisked together with three cups of cold milk. Mixing both flavors together creates something richer and more interesting than either one alone. The pudding thickens up fast, so whisk quickly and spread it over the cream cheese layer right away. This double-pudding layer is what gives the dessert its signature chocolate-meets-vanilla taste that so many families remember.
That said, there is no rule that says you have to use both. Some people go all chocolate for a deeper, more intense result. Others swap in butterscotch pudding, and one longtime fan from Iowa claims the butterscotch version got its name because the pudding matched Robert Redford’s hair color. Who knows if that is true, but it is a fun story. The point is that instant pudding comes in plenty of varieties, so feel free to get creative. Pistachio, banana cream, and white chocolate are all fair game. The structure of the dessert stays the same no matter which pudding you pick.
Cool Whip versus homemade whipped cream
This is where things get personal. The original recipe from the ’70s almost always calls for Cool Whip. It is easy, it holds its shape in the fridge, and it does not deflate overnight. For the cream cheese layer, you fold in one 8-ounce container. For the top layer, you spread on a second container. Some stores used to sell 12-ounce containers of Cool Whip, which was the perfect amount — half for the filling and half for the top. Those are harder to find now, but two 8-ounce tubs work just fine.
On the other hand, homemade whipped cream tastes noticeably better. Whip two cups of heavy cream with a quarter cup of powdered sugar until stiff peaks form. Use about three-quarters of it in the cream cheese layer and save the rest for the top. Homemade whipped cream also gives the pudding dessert a thicker, more sliceable consistency compared to the boxed pudding and Cool Whip version. The trade-off is that homemade cream is a bit less stable and needs to be eaten within a day or two. Cool Whip lasts longer in the fridge. Pick whichever one fits the occasion.
Make it ahead and it gets even better
This is a dessert that actually improves with time in the fridge. It needs at least two hours to set up properly, but overnight is even better. The layers firm up, the crust absorbs just enough moisture to become tender without going soft, and everything melds together. Several home cooks even recommend freezing it instead of just refrigerating. Freezing keeps the layers distinct and prevents them from blending into each other. Just pull it out about 15 minutes before serving so it is easy to cut.
Because it is a make-ahead dessert, it is perfect for holidays, potlucks, and birthday parties. No last-minute scrambling in the kitchen. Assemble it the night before, stick it in the fridge, and forget about it until serving time. Right before bringing it to the table, add chocolate shavings on top. The easiest way to make those is to run a sharp vegetable peeler along the edge of a semi-sweet baking chocolate bar. It takes about 30 seconds and makes the whole dessert look like it came from a fancy bakery. A few extra chopped nuts scattered on top add a nice finishing touch too.
Simple swaps to make it your own
One of the best things about this recipe is how easy it is to change up. Swap the pecan crust for a graham cracker crust if you want something simpler. One reviewer did exactly that and said it worked beautifully with the chocolate layers. Crushed Oreos sprinkled on top instead of chocolate shavings add a fun crunch. If someone in the family has a nut allergy, just leave the nuts out of the crust entirely and increase the flour by a couple of tablespoons to make up for it.
For the pudding layer, the possibilities really open up. Lemon pudding with a graham cracker crust turns it into a completely different dessert that is great for summer. Banana cream pudding with sliced bananas tucked into the cream cheese layer is another crowd favorite. Some people even skip the pudding mix altogether and make chocolate pudding from scratch. That gives a thicker, creamier result that slices more cleanly. However you make it, the four-layer structure stays the same. Crust, cream cheese, pudding, whipped topping. Simple, reliable, and always a hit.
Whether it is called Robert Redford Dessert, Chocolate Lush, or something entirely different in your family, this four-layer treat has earned its place as a go-to for gatherings. It takes about 45 minutes of hands-on time, feeds a crowd from a single 9×13 pan, and tastes better the next day. Make one for your next get-together and watch how fast it disappears. Just be ready — someone will definitely ask for the recipe.
Next Best Thing to Robert Redford Dessert
Course: DessertCuisine: American12
servings20
minutes25
minutes477
kcalThis famous four-layer dessert from the 1970s has a buttery pecan crust, cream cheese filling, chocolate and vanilla pudding, and whipped topping that will have everyone asking for seconds.
Ingredients
1 ¼ cups all-purpose flour
10 tablespoons butter, melted
1 cup finely chopped pecans or walnuts
8 ounces cream cheese, softened
1 cup powdered sugar
1 teaspoon vanilla extract
16 ounces whipped topping such as Cool Whip (two 8-ounce containers), divided
1 package (5.1 oz) vanilla instant pudding mix
1 package (5.9 oz) chocolate fudge instant pudding mix
3 cups cold milk
¼ cup grated semi-sweet chocolate bar, for garnish
Directions
- Preheat the oven to 350 degrees F and coat a 13×9-inch baking dish with nonstick cooking spray. In a medium mixing bowl, combine the flour, melted butter, and finely chopped pecans or walnuts. Stir until the mixture is well combined and crumbly.
- Press the crust mixture evenly into the bottom of the prepared baking dish. Use the back of a measuring cup or your fingers to press it down firmly. Bake for 20 to 25 minutes, or until the edges are lightly golden brown.
- Remove the pan from the oven and set it on a wire rack to cool completely. This step is important — if the crust is still warm, the cream cheese layer will melt and not set properly. Allow at least 30 minutes for cooling.
- In a separate bowl, use an electric mixer to beat the softened cream cheese, powdered sugar, and vanilla extract until smooth and creamy. Fold in one 8-ounce container of Cool Whip and stir gently until everything is well combined. Spread this mixture evenly over the cooled crust using an offset spatula or the back of a spoon.
- In a clean bowl, whisk together both the vanilla instant pudding mix and the chocolate fudge instant pudding mix with 3 cups of cold milk. Whisk briskly for about 2 minutes until the mixture is smooth and starts to thicken. Work quickly because it sets up fast.
- Spread the thickened pudding mixture evenly over the cream cheese layer, taking care to reach all the way to the edges of the pan. Use a spatula to smooth the top as evenly as possible. This layer should be thick and rich.
- Spread the remaining 8-ounce container of Cool Whip over the pudding layer. You can use the entire container or a bit less depending on your preference. Smooth it out gently with a spatula for a clean finish.
- Cover the dish with plastic wrap and refrigerate for at least 2 hours or overnight for best results. When ready to serve, garnish with grated semi-sweet chocolate and additional chopped nuts if desired. Run a vegetable peeler along a chocolate bar for easy chocolate shavings.
Notes
- For a thinner whipped topping layer, use one 12-ounce container of Cool Whip instead of two 8-ounce containers. Use half in the cream cheese layer and the rest on top.
- This dessert can be frozen instead of refrigerated. Freezing keeps the layers more distinct. Pull it out 15 minutes before serving for easier slicing.
- You can substitute the pudding flavors with butterscotch, lemon, banana cream, or any instant pudding variety you like. Use the same total amount of pudding mix and milk.
- Neufchatel (one-third less fat) cream cheese works just as well as regular cream cheese in this recipe.
Frequently Asked Questions
Q: Can I make this dessert without nuts?
A: Yes. Simply leave the nuts out of the crust and add a couple of extra tablespoons of flour to keep the crust from being too thin. The shortbread base will still bake up golden and hold the layers together nicely.
Q: How far in advance can I make this?
A: You can assemble it up to 24 hours ahead and keep it covered in the refrigerator. It actually tastes better the next day because the layers have time to set. You can also freeze it for up to a week and thaw it briefly before serving.
Q: Can I use homemade pudding instead of instant?
A: Absolutely. Homemade pudding gives a thicker, creamier result that slices more cleanly. Just make sure the pudding is completely cooled before spreading it over the cream cheese layer. You can make it up to two days ahead and store it in the fridge.
Q: What can I use instead of Cool Whip?
A: Homemade whipped cream works great. Whip two cups of heavy cream with a quarter cup of powdered sugar until stiff peaks form. Use about three-quarters in the cream cheese layer and save the rest for the top. Keep in mind it is a bit less stable than Cool Whip, so serve within a day or two.
