
Making gravy shouldn’t be a stressful guessing game that leaves everyone disappointed. Most home cooks struggle with lumpy, thin, or overly salty gravy because they don’t know the simple ratios and techniques that guarantee success every time. The truth is, perfect gravy comes down to understanding three basic ingredients and one foolproof method that works whether you’re making a weeknight dinner or a holiday feast.
Understanding the basic gravy ratio
The secret to consistent gravy lies in a simple mathematical formula that takes all the guesswork out of the process. For every cup of gravy you want to make, you need exactly one tablespoon of fat, one tablespoon of flour, and one cup of liquid. This ratio scales perfectly whether you’re making two cups for a small family dinner or six cups for a holiday crowd. Most families need about half a cup of gravy per person, so plan accordingly when calculating your amounts.
This foolproof method eliminates the common problem of adding random amounts of ingredients and hoping for the best. Write down this ratio and keep it handy in your kitchen because once you memorize it, you’ll never make bad gravy again. The consistency comes from the precise balance between the thickening power of flour and the richness of fat, all dissolved into the right amount of liquid to create that perfect coating consistency.
Creating the perfect roux foundation
A roux is simply fat and flour cooked together, and it’s the foundation that separates great gravy from mediocre gravy. Start by melting your fat (butter, pan drippings, or bacon grease) in a medium saucepan over medium heat. Once the fat is hot, whisk in the flour and cook this mixture for about three to five minutes, whisking constantly. The mixture will bubble and foam, which is exactly what you want to see happening in your pan.
The color of your roux determines the final appearance of your gravy, so cook it until it reaches a golden caramel color that matches what you want your finished gravy to look like. This cooking step is crucial because it eliminates the raw flour taste that ruins so many homemade gravies. The mixture should smell nutty and rich, almost like it could be used for dessert. Don’t rush this step because properly cooked roux is what gives your gravy its deep, complex base.
Adding liquid without creating lumps
The moment when you add liquid to your roux is when most gravies either succeed brilliantly or turn into a lumpy disaster. Remove your pan from the heat before adding any liquid, and always add it gradually while whisking constantly. Start with just a few tablespoons of your chosen liquid and whisk vigorously until smooth before adding more. The mixture will seize up and look clumpy at first, but keep whisking and it will smooth out perfectly.
Continue adding liquid in small increments, whisking between each addition until the mixture is completely smooth. This gradual process prevents lumps from forming and ensures even distribution throughout your gravy. If you do end up with stubborn lumps despite your best efforts, pour the gravy through a fine mesh strainer or blend it briefly with an immersion blender to restore the smooth consistency everyone expects.
Choosing the right liquid for maximum taste
Pan drippings provide the most intense and authentic gravy experience, but they’re not always available or usable, depending on how your meat was prepared. When you do have drippings, separate the fat from the juices using a gravy separator or by chilling the drippings until the fat solidifies on top. Always taste your drippings before using them because sometimes they can be too salty or have off-putting qualities that will ruin your entire batch of gravy.
Store-bought broth works beautifully when drippings aren’t available or when you want to dilute overly salty drippings. Choose chicken broth for poultry and pork gravies, and beef broth for beef gravies to maintain appropriate pairing. Low-sodium versions give you better control over the final seasoning, and you can always enhance the liquid with a splash of wine, Worcestershire sauce, or even a bit of soy sauce for extra depth and complexity.
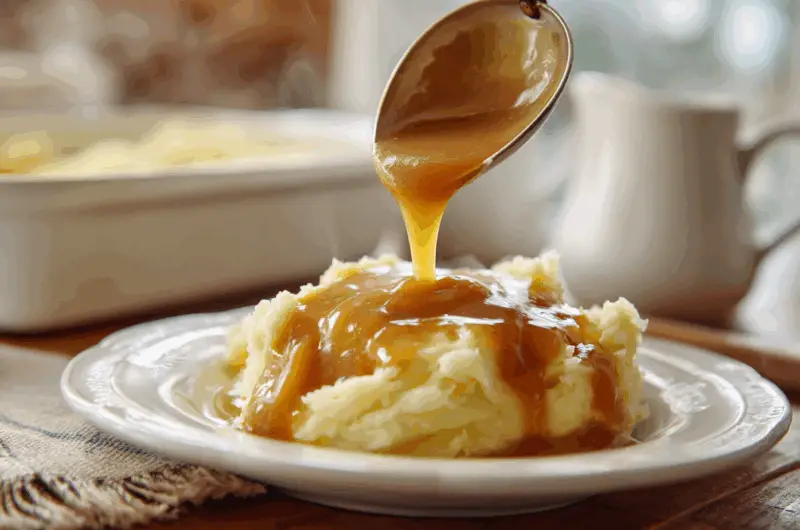
Achieving the ideal thickness every time
Perfect gravy should coat the back of a spoon without being so thick that it resembles paste or so thin that it runs off your mashed potatoes like water. After adding all your liquid, return the pan to medium heat and let the gravy simmer for about ten to fifteen minutes, whisking occasionally. The simmering process activates the thickening power of the flour and allows the gravy to reach its final consistency while developing deeper flavors.
If your finished gravy is too thin, make a slurry by mixing one tablespoon of cornstarch with one tablespoon of cold water until smooth, then whisk this into the simmering gravy. For gravy that’s too thick, simply whisk in additional broth or drippings a little at a time until you reach the desired consistency. Remember that gravy continues to thicken slightly as it cools, so err on the side of slightly thinner rather than too thick.
Seasoning and final touches
Proper seasoning transforms basic gravy into something memorable that people ask about long after the meal is over. Start with salt and pepper, but taste before adding because pan drippings often contribute significant saltiness on their own. Black pepper should be freshly ground for the best impact, and don’t be shy about using more than you think you need because pepper is a traditional and expected element in good gravy.
A few drops of Worcestershire sauce add umami depth that makes people wonder what your secret ingredient is, while a splash of vinegar or lemon juice brightens the entire dish. Fresh herbs like thyme, sage, or rosemary work beautifully when added during the final few minutes of simmering. Taste frequently during this stage because the difference between good gravy and great gravy often comes down to those final seasoning adjustments that complement your specific meal.
Making gravy without pan drippings
Sometimes you need gravy but don’t have a roast, or the drippings didn’t turn out well enough to use. In these situations, butter becomes your fat source, and good-quality broth carries the liquid responsibilities perfectly well. Use the same ratios and techniques, but you’ll need to be more generous with seasonings since you’re missing the concentrated meat flavors that drippings normally provide to your gravy base.
Enhance broth-based gravy by browning some mushrooms, onions, or garlic in the pan before making your roux, or add a tablespoon of tomato paste for extra richness and color. Soy sauce, beef or mushroom bouillon paste, and even a splash of red wine can compensate for the missing pan drippings. The key is building layers of umami and richness through multiple ingredients rather than relying on the single concentrated source that drippings provide.
Storing and reheating leftover gravy
Leftover gravy keeps in the refrigerator for up to three days and actually often tastes better the next day as the ingredients have more time to meld together. Store it in a covered container and expect it to thicken considerably as it cools, which is completely normal and doesn’t indicate any problems with your original preparation. Cold gravy might look almost solid, but it will return to proper consistency when reheated properly.
Reheat gravy gently over low heat, whisking frequently and adding small amounts of broth or water as needed to restore the original consistency. Never reheat gravy in the microwave without stirring every thirty seconds because it heats unevenly and can develop an unpleasant texture. Properly reheated gravy should look and taste just as good as when it was first made, making it perfect for turning leftovers into exciting new meals.
Troubleshooting common gravy problems
Even experienced cooks occasionally run into gravy problems, but most issues have simple solutions that can save your sauce without starting over. Lumpy gravy responds well to vigorous whisking, straining through a fine mesh sieve, or a quick blend with an immersion blender. Gravy that tastes too floury means the roux wasn’t cooked long enough initially, but simmering it longer while whisking can often resolve the raw flour taste that nobody wants.
Overly salty gravy can be rescued by adding more unsalted liquid, a splash of cream, or even a small amount of sugar to balance the saltiness. Gravy that broke or separated usually means the temperature got too high too quickly, but whisking in a tablespoon of cold butter often brings it back together. The most important thing to remember is that gravy is forgiving, and most problems have fixes that don’t require throwing everything away and starting from scratch.
Perfect homemade gravy transforms ordinary meals into memorable experiences that bring families together around the dinner table. Once you master this straightforward technique and understand the basic ratios, you’ll have the confidence to make excellent gravy for any occasion without stress or uncertainty about the results.
Perfect Homemade Gravy Recipe
Course: Side DishCuisine: American6
servings5
minutes15
minutes45
kcalA foolproof gravy recipe that delivers rich, smooth results every single time using simple ingredients and basic ratios.
Ingredients
3 tablespoons butter or pan drippings
3 tablespoons all-purpose flour
3 cups chicken or beef broth
Salt to taste
Freshly ground black pepper to taste
1 teaspoon Worcestershire sauce (optional)
Directions
- Melt the butter or heat the pan drippings in a medium saucepan over medium heat. Make sure the fat is hot and bubbling before proceeding to the next step. If using pan drippings, strain them first to remove any solid bits that could create texture issues.
- Whisk in the flour and cook the mixture for 3-5 minutes, stirring constantly until it turns a golden caramel color. This step cooks out the raw flour taste and creates the roux foundation. The mixture should smell nutty and rich when properly cooked.
- Remove the pan from the heat and slowly whisk in the broth, starting with just a few tablespoons at a time. The mixture will seize up and look clumpy initially, but keep whisking vigorously until smooth before adding more liquid. Continue this process until all the broth is incorporated.
- Return the pan to medium heat and bring the gravy to a simmer, whisking occasionally. Let it bubble gently for 10-15 minutes until it thickens to a consistency that coats the back of a spoon. The gravy should be smooth and rich in appearance.
- Taste the gravy and season with salt, pepper, and Worcestershire sauce as needed. Start with small amounts and adjust to your preference since pan drippings can contribute significant saltiness. Add seasonings gradually and taste between additions.
- If the gravy is too thin, mix 1 tablespoon cornstarch with 1 tablespoon cold water to create a slurry, then whisk it into the simmering gravy. If too thick, whisk in additional broth until the desired consistency is reached. Serve immediately while hot.
Notes
- For best results, use a flat whisk, which gets into the corners of the pan better than a balloon whisk
- Gravy can be made ahead and reheated gently over low heat, whisking in additional broth if needed to restore consistency
- If using very salty pan drippings, dilute with unsalted broth to prevent overly salty gravy
- Leftover gravy keeps refrigerated for 3 days and can be frozen for up to 3 months
Frequently Asked Questions
Q: Can I make gravy ahead of time for big dinners?
A: Yes, gravy can be made up to 2 days in advance and stored in the refrigerator. Reheat it gently over low heat, whisking frequently and adding small amounts of broth if needed to restore the proper consistency. It often tastes even better after the ingredients have time to meld together.
Q: What should I do if my gravy turns out lumpy despite following the recipe?
A: Strain the gravy through a fine mesh sieve, or use an immersion blender to smooth it out. You can also pour it into a regular blender, but be careful with hot liquids and remove the center cap from the lid, covering with a towel to prevent splattering.
Q: How can I make gravy without any meat drippings for vegetarian meals?
A: Use butter as your fat and vegetable broth as your liquid, following the same ratios and techniques. Enhance the umami by adding mushroom broth, soy sauce, or nutritional yeast. Sautéing mushrooms or onions before making the roux also adds extra depth and richness.
Q: Why does my gravy sometimes taste like flour even after cooking it for several minutes?
A: The roux wasn’t cooked long enough to eliminate the raw flour taste. Make sure to cook the butter and flour mixture for at least 3-5 minutes until it smells nutty and turns a golden color. If it still tastes floury, continue simmering the finished gravy for a few more minutes.
