
Most people think they know how to make scrambled eggs, but chances are they’ve been doing it wrong their entire lives. The difference between rubbery, dry scrambled eggs and silky, restaurant-quality ones isn’t complicated ingredients or fancy equipment – it’s all about technique. Gordon Ramsay’s method completely changes the game by cooking eggs in a way that seems totally backward but produces the creamiest results imaginable.
Why most scrambled eggs turn out terrible
Walk into any diner and watch them make scrambled eggs – they’ll crack them into a bowl, whisk them up, dump them in a hot pan, and stir occasionally until they’re done. This approach creates those chunky, separated curds that need ketchup to be palatable. The eggs cook too fast, the proteins seize up, and moisture gets squeezed out like wringing a sponge.
The real problem isn’t just the heat – it’s the timing and technique. When eggs hit a screaming hot pan, the bottom layer cooks immediately while the top stays liquid. This uneven cooking creates dry spots and wet spots that never quite come together. Professional chefs know that great scrambled eggs require patience and constant attention, not the set-it-and-forget-it approach most people use.
The counterintuitive cold pan method
Here’s where things get weird – the best scrambled eggs start in a cold pan. Crack your eggs directly into a room-temperature, non-stick saucepan, add cold butter, then turn on the heat. This goes against everything most people learned about cooking, but it works because the eggs and butter heat up together gradually. The slow temperature rise prevents the proteins from shocking and seizing up.
As the pan warms, start stirring constantly with a rubber spatula, scraping the bottom and sides continuously. The key is never stopping – this isn’t a “stir every few minutes” situation. The constant motion prevents any part of the eggs from overcooking while distributing the heat evenly throughout. After about 30 seconds on medium-high heat, pull the pan completely off the burner while continuing to stir, then return it after 10 seconds.
The on and off heat dance
This weird on-and-off-the-heat routine might seem unnecessary, but it’s actually genius. When eggs cook too fast, the proteins form tight bonds that squeeze out moisture, creating those rubbery chunks everyone hates. By removing the pan from heat regularly, the cooking process slows down just enough to keep the proteins relaxed and the texture creamy.
Keep up this dance for about three minutes total – 30 seconds on the heat, 10 seconds off, stirring the entire time. Watch for the moment when the eggs stop running to fill gaps when stirred. That’s when they’re almost ready, but here’s the crucial part: take them off the heat while they still look slightly underdone. The residual heat will finish cooking them perfectly without going too far.
Essential tools and setup
A non-stick saucepan is absolutely critical for this method – trying to do this in stainless steel will result in stuck, burnt eggs no matter how much butter is used. The saucepan shape is better than a skillet because the higher sides make stirring easier and prevent eggs from flying out during the vigorous mixing process.
A rubber or silicone spatula works best for the constant stirring because it won’t scratch the non-stick surface and conforms to the pan’s curves better than a wooden spoon. Some people swear by using a whisk, but that can actually make the eggs too frothy and incorporate too much air. Professional techniques focus on smooth, controlled stirring motions rather than aggressive whisking.
Getting the egg quality right
Not all eggs are created equal when it comes to scrambling. Fresh, free-range eggs with bright orange yolks create a richer, more luxurious final product than standard grocery store eggs. The difference is noticeable both in color and texture – fresher eggs hold together better during the gentle cooking process and have more complex taste.
Room temperature eggs work better than cold ones straight from the refrigerator because they heat more evenly and don’t shock the butter when combined. Take the eggs out about 30 minutes before cooking, or place them in a bowl of warm water for five minutes to bring them to room temperature quickly. Cold eggs can create uneven cooking and make it harder to achieve that perfect creamy consistency.
The perfect butter ratio
Butter is what transforms ordinary scrambled eggs into something special, but the amount matters more than most people realize. The magic ratio is about one tablespoon of butter per three eggs – any less and the eggs won’t be creamy enough, any more and they become greasy. The butter needs to be cold when added to the cold pan so everything heats up together.
As the pan heats up, the butter melts and coats the eggs, creating tiny pockets of richness throughout. This isn’t just about grease – the milk solids in butter add complexity while the fat creates that silky mouthfeel. Some chefs add an extra small pat of cold butter at the very end, stirring it in off the heat for an extra boost of creaminess.
When to season and why it matters
Salt timing can make or break scrambled eggs, and most people get this completely wrong. Adding salt too early can break down the egg proteins and create a watery mess, while adding it too late means the eggs won’t be seasoned evenly. The sweet spot is adding salt just after the eggs come off the heat for the final time, when they’re almost done but still slightly wet.
A small pinch of kosher salt and freshly cracked black pepper are all that’s needed – the eggs should taste like enhanced eggs, not salt. Some chefs add a teaspoon of crème fraîche at this stage for extra richness and a slight tangy note that balances the butter. Fresh herbs like chives or dill can be folded in now too, but they should be added off the heat to prevent them from wilting completely.
Common mistakes that ruin everything
The biggest mistake is not trusting the process and cranking up the heat when the eggs seem to be cooking too slowly. This technique requires patience – rushing it by using higher heat defeats the entire purpose and results in the same old rubbery eggs. Another common error is stopping the stirring motion, which allows parts of the eggs to overcook while others remain liquid.
Many people also cook the eggs too long, waiting until they look completely set in the pan. But eggs continue cooking from residual heat even after being removed from the stove, so they need to come off while still looking slightly underdone. Overcooking is irreversible – there’s no way to fix eggs that have gone too far, so it’s better to err on the side of slightly underdone.
Variations and add-ins that actually work
Once the basic technique is mastered, these creamy scrambled eggs become a canvas for other ingredients. Smoked salmon and dill, sautéed mushrooms and gruyere, or fresh tomatoes and basil all work beautifully when added at the right moment. The key is adding delicate ingredients like herbs and cheese off the heat so they don’t overcook.
For ingredients that need cooking like mushrooms or onions, sauté them separately first and fold them in during the final moments. Raw ingredients don’t work well with this method because there isn’t enough cooking time to properly develop them. Truffle oil, caviar, or lobster can transform these eggs into something truly luxurious, but the base technique remains exactly the same regardless of how fancy the add-ins get.
These creamy scrambled eggs will completely change breakfast game and prove that simple techniques often produce the most extraordinary results. The method seems strange at first, but once tasted, it’s impossible to go back to the old way of making scrambled eggs.
Gordon Ramsay’s Creamy Scrambled Eggs
Course: BreakfastCuisine: British2
servings2
minutes6
minutes220
kcalSilky, restaurant-quality scrambled eggs using the famous cold pan method that creates the creamiest texture possible.
Ingredients
6 large free-range eggs, cold
1½ tablespoons cold unsalted butter, divided
Kosher salt to taste
Freshly ground black pepper to taste
1 teaspoon crème fraîche (optional)
Fresh chives, finely chopped for garnish
Directions
- Crack the cold eggs directly into a cold, non-stick saucepan without whisking them first. Add the cold butter pieces to the pan with the eggs. This cold start method is crucial for achieving the creamy texture.
- Turn the heat to medium-high and immediately begin stirring continuously with a rubber spatula, scraping the bottom and sides of the pan constantly. Don’t stop stirring once you start – this constant motion is essential for even cooking.
- After about 30 seconds on the heat, remove the entire pan from the burner while continuing to stir vigorously for 10 seconds. The eggs will continue cooking from residual heat. This on-and-off technique prevents overcooking.
- Return the pan to the heat and repeat the process – 30 seconds on heat, 10 seconds off heat, stirring constantly throughout. Continue this cycle for about 3 minutes total cooking time until large, creamy curds begin to form.
- Watch carefully for the moment when the eggs no longer run to fill gaps when stirred – they should still look slightly wet and underdone. Remove from heat completely while they appear about 80% cooked, as they’ll continue cooking off the heat.
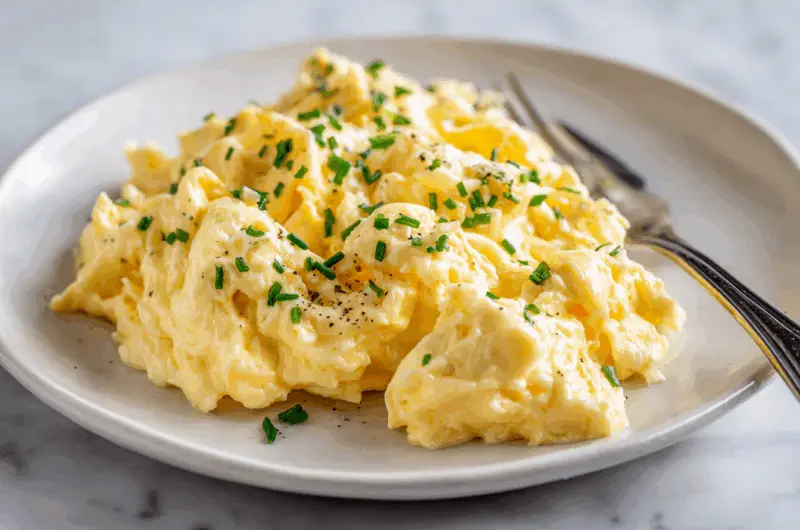
- Season the eggs with a pinch of kosher salt and freshly ground black pepper while off the heat. Stir in the crème fraîche if using for extra richness. The eggs should be creamy, silky, and barely set.
- Transfer immediately to plates and garnish with freshly chopped chives. Serve right away while the eggs are still warm and creamy. These eggs are best enjoyed immediately and don’t hold well.
Notes
- Use the freshest eggs possible for the best texture and color – free-range eggs with bright orange yolks work exceptionally well
- A non-stick saucepan is absolutely essential for this technique – stainless steel will cause sticking and uneven cooking
- Never stop stirring once you begin cooking, and trust the process even when the eggs seem to be cooking slowly
- Remove from heat while eggs still look slightly underdone – they continue cooking from residual heat and will be perfect by serving time
Frequently asked questions
Q: Why do the eggs need to start in a cold pan with cold butter?
A: Starting cold allows the eggs and butter to heat up gradually together, preventing the proteins from seizing up and creating a smoother, creamier texture than adding eggs to an already hot pan.
Q: How do I know when the eggs are done if they still look wet?
A: The eggs are ready when they no longer run to fill gaps when stirred, even though they appear slightly underdone. They’ll finish cooking perfectly from residual heat off the stove.
Q: Can I make these scrambled eggs ahead of time for a crowd?
A: These eggs are best served immediately as they don’t hold well. For larger batches, use the same technique with more eggs but increase cooking time slightly and stir more frequently.
Q: What’s the difference between using a whisk and a rubber spatula?
A: A rubber spatula scrapes the pan better and incorporates less air than a whisk, resulting in denser, creamier eggs. Whisking can make the eggs too frothy and light.
