
Most people think baking a potato is the easiest thing in the world. Toss it in the oven, wait an hour, and call it done. But what if that approach has been giving dry, sad potatoes this entire time? A few small changes to the process can turn an average spud into something seriously impressive. From picking the right potato to nailing the perfect crispy skin, there are mistakes almost everyone makes without even realizing it. Here is how to fix every single one of them.
Not all potatoes work for baking
Ever pulled a baked potato out of the oven and wondered why it turned out waxy and dense instead of light and fluffy? The problem probably started at the grocery store. Not every potato is meant for baking. Waxy varieties like red potatoes or Yukon Golds hold their shape well, which makes them great for soups and salads. But for a classic baked potato, they just do not get that soft, crumbly inside that everyone loves. The type of potato matters way more than most people think.
Russet potatoes, sometimes called Idaho potatoes, are the best choice for baking. They have a high starch content, which means the inside gets incredibly fluffy when cooked properly. Look for ones that are firm, have no green spots, and feel heavy for their size. Most major grocery stores carry bags of Russets from brands like Green Giant or store brands. Grab the biggest ones for the best results. A good baked potato always starts with choosing the right spud from the pile.
Skipping the scrub makes a big difference
Potatoes grow underground, which means they come out of the dirt covered in soil and grime. A quick rinse under the faucet is not enough. The skin of a baked potato is meant to be eaten, and nobody wants to bite into grit. Plus, any seasoning added before baking will stick much better to a clean, slightly damp potato. Taking an extra minute to really scrub the skin pays off in a major way once everything comes out of the oven.
Use a vegetable brush or even a clean kitchen sponge to scrub the entire surface under cool running water. Pay special attention to the ends and any eyes or rough spots. Once scrubbed, pat the potato dry with a paper towel. This step also helps the skin crisp up later. Wet skin creates steam, and steam is the enemy of crispiness. A dry, clean potato is the real starting point. It sounds simple, but this one habit separates a forgettable baked potato from one that actually tastes like it came from a steakhouse.
Stop wrapping potatoes in foil
This is probably the biggest mistake people make. Wrapping a potato in aluminum foil before putting it in the oven seems like common sense. It keeps things tidy and heats evenly, right? Actually, foil traps steam around the potato. That steam turns the skin soft and soggy instead of crispy. It essentially steams the potato rather than baking it. The result is a limp, almost rubbery skin that peels away and has no real appeal. Real baked potatoes should have skin worth eating.
Place the potato directly on the oven rack with nothing wrapped around it. If drips are a concern, put a sheet pan on the rack below to catch anything. Going foil-free lets the dry heat of the oven work directly on the skin. That direct contact is what creates the salty, crispy shell that makes a baked potato so satisfying. Save the foil for wrapping leftovers later. During baking, the potato needs to breathe and dry out on the outside while cooking soft on the inside.
Oil and salt on the skin changes everything
A plain potato going into the oven is a missed opportunity. Before baking, rub the entire surface with a thin layer of olive oil or vegetable oil. Then sprinkle kosher salt or coarse sea salt generously all over the outside. The oil helps conduct heat more evenly across the skin, and the salt draws out just enough moisture to help it crisp. Together, they create a shell that is salty, crunchy, and genuinely delicious. It takes about thirty seconds and changes the whole experience.
Some people even add a light dusting of garlic powder or black pepper at this stage. That is totally optional but adds a nice touch. The key is making sure every inch of the potato is coated. Roll it around in the oil and salt on a sheet pan if that is easier. Do not be shy with the salt either. Most of it falls off or stays on the skin surface, so the inside will not end up too salty. This small move makes the skin taste almost like a thick, savory potato chip.
Poking holes actually matters a lot
There is an old kitchen rule about poking holes in potatoes before baking, and it is not just a myth. Potatoes contain a lot of water. As they heat up in the oven, that water turns to steam. Without any escape route, pressure builds up inside the potato. In rare cases, they can actually burst open in the oven. That is a mess nobody wants to clean up. A few quick pokes with a fork solve this problem completely.
Use a regular dinner fork and poke the potato about six to eight times on all sides. Space the holes out evenly so steam can escape from multiple points. This also helps the inside cook a bit more evenly since the steam is not trapped and creating hot spots. It literally takes five seconds per potato. Think of it like poking a sausage casing before cooking. It is a tiny step, but skipping it is a gamble with a potentially exploding potato. Nobody needs that kind of surprise on a Tuesday night.
The oven temperature most people use is wrong
A lot of recipes say to bake potatoes at 350°F. That works, but it takes a really long time and often produces a drier result. Bumping the oven up to 400°F or even 425°F cuts down the cooking time and gives much better skin. The higher heat crisps the outside faster while the inside steams itself soft. It is the sweet spot between cooking through completely and getting that perfect exterior. Lower temperatures just do not create the same contrast between crispy outside and fluffy inside.
At 400°F, a medium-sized Russet potato takes about 50 to 60 minutes. Larger ones may need closer to 75 minutes. The potato is done when a knife slides in easily with almost no resistance. Another way to check is to give it a gentle squeeze with an oven mitt. If it gives easily and feels soft inside, it is ready. Do not rush it. An undercooked baked potato is chalky and unpleasant. Patience at the right temperature makes all the difference between good and great.
Fluffing the inside is a step most people skip
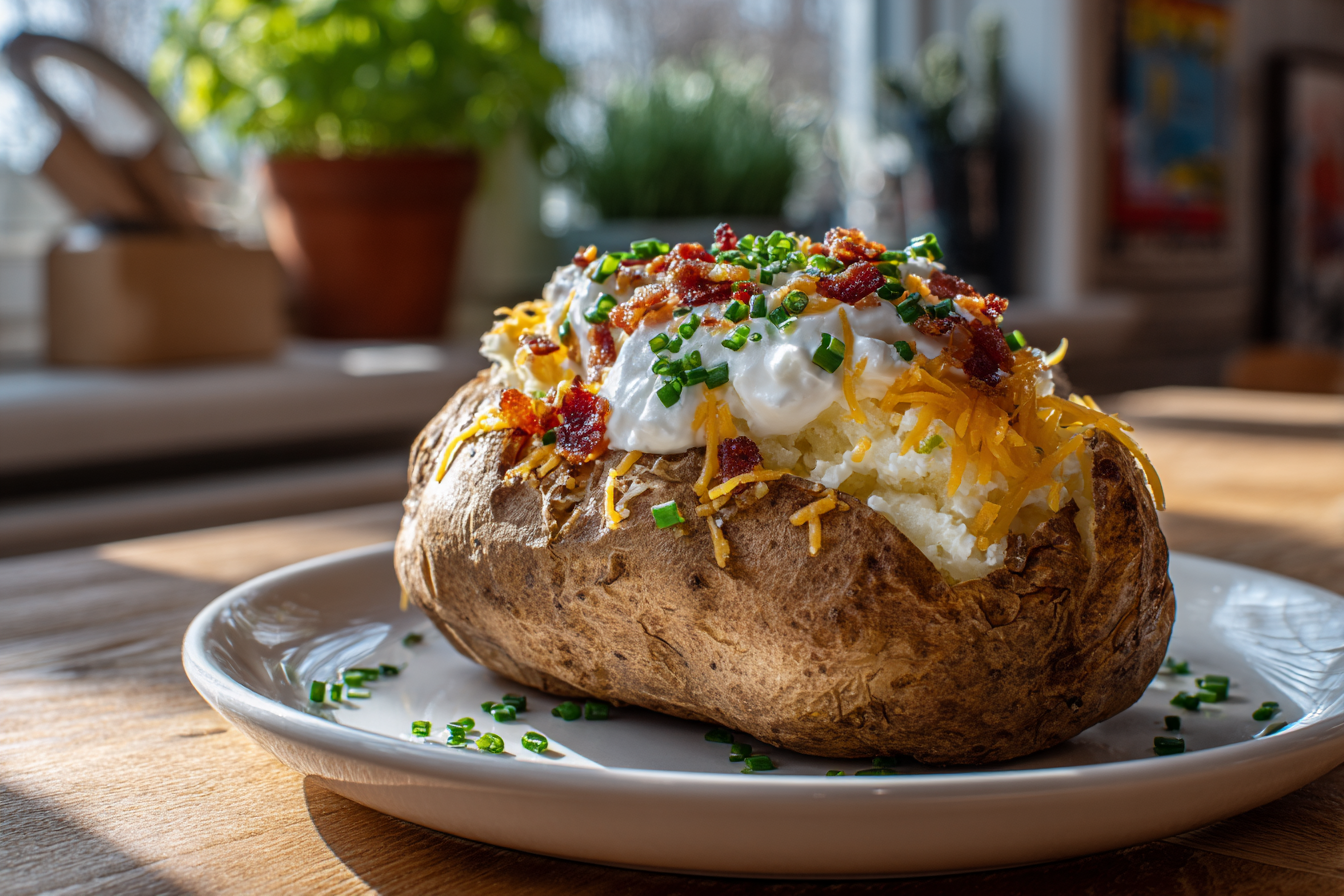
Here is where a lot of people go wrong even after baking a perfectly cooked potato. They slice it open, throw on some butter, and eat. But the inside is still dense and compacted. The trick is to fluff the potato right after cutting it open. Cut a line down the center lengthwise, then push both ends inward toward the middle. The potato should split open and the inside should break apart into a light, airy pile. This creates pockets that catch butter and toppings beautifully.
Use a fork to gently loosen the flesh even more once it is pushed open. Do not mash it flat. Just break it up lightly so air gets in. This makes each bite soft and pillowy instead of gummy and stiff. Steam will escape when the potato opens up, which also prevents the inside from turning wet and heavy. This one move makes a regular baked potato feel restaurant-quality. It is the kind of small detail that separates okay from outstanding, and it takes about five seconds.
Butter goes in first before any topping
Toppings are the best part of a baked potato, and the order matters more than most people realize. Butter should always go in first, right after fluffing. Drop a generous pat of real butter into the center of the hot potato and let it melt down into all those little crevices. Salted butter from brands like Kerrygold or Land O’Lakes works perfectly. The heat of the potato will melt it almost instantly. This creates a rich base layer that everything else sits on top of.
After the butter melts, add sour cream next. Then pile on shredded cheese, bacon bits, and chopped chives or green onions. Each layer traps the one below it and keeps everything in place. If the cheese goes in while the potato is still very hot, it will start to melt slightly. That half-melted cheese situation is perfect. The whole thing becomes a loaded masterpiece in about one minute. Building toppings in this order makes every single bite consistent from the first forkful to the very last one.
Leftover baked potatoes are more useful than expected
Making extra baked potatoes on purpose is one of the smartest things to do during meal prep. A leftover baked potato keeps in the fridge for up to four days. Cold baked potatoes can be sliced in half, scooped, and turned into twice-baked potatoes the next day. They can also be cubed and fried in a skillet with some oil for crispy home fries. The already-cooked interior means breakfast potatoes are ready in just a few minutes the next morning.
Another trick is scooping out the insides, mixing them with butter and cheese, and stuffing them back in the shells. Then pop them under the broiler for five minutes. That twice-baked method turns a plain leftover into something that feels brand new. Baked potatoes also freeze surprisingly well when wrapped tightly in plastic wrap and foil. Reheat them in the oven at 350°F for about 20 minutes. Having a stash of pre-baked potatoes in the freezer means a quick dinner side is always available without any extra effort.
A perfect baked potato is not about fancy techniques or expensive ingredients. It comes down to choosing the right potato, prepping the skin properly, skipping the foil, and baking at a higher temperature. The fluffing step and topping order are the finishing touches that pull everything together. Once these simple habits become second nature, every baked potato that comes out of the oven will be noticeably better. Sometimes the best meals are the simplest ones done right.
Perfect Crispy-Skin Loaded Baked Potatoes
Course: DinnerCuisine: American4
servings10
minutes1
hour380
kcalThe only baked potato recipe that gives crispy, salty skin and a fluffy, loaded inside every single time.
Ingredients
4 large Russet potatoes
2 tablespoons olive oil
1 tablespoon kosher salt
4 tablespoons salted butter
½ cup sour cream
1 cup shredded cheddar cheese
4 slices cooked bacon, crumbled
2 tablespoons chopped fresh chives
Black pepper to taste
Directions
- Preheat the oven to 400°F and move one oven rack to the center position. Place a sheet pan or piece of foil on the rack below to catch any drips during baking.
- Scrub each Russet potato thoroughly under cool running water using a vegetable brush. Remove any dirt, debris, or rough spots, then pat each potato completely dry with a clean paper towel.
- Use a fork to poke each potato 6 to 8 times on all sides, spacing the holes evenly. This allows steam to escape during baking and prevents the potatoes from bursting open in the oven.
- Rub each potato with about half a tablespoon of olive oil, coating the entire surface evenly. Sprinkle kosher salt generously over every potato, pressing lightly so the salt sticks to the oiled skin.
- Place the potatoes directly on the center oven rack with no foil wrapping. Bake for 50 to 60 minutes, or up to 75 minutes for very large potatoes, until a knife slides into the center with no resistance.
- Remove the potatoes from the oven and let them rest for 2 to 3 minutes. Cut a lengthwise slit down the center of each potato, then push both ends inward to open and fluff the inside.
- Use a fork to gently loosen the flesh inside each potato a bit more, creating pockets for the toppings. Be careful not to mash the potato flat; the goal is a light, airy interior.
- Add one tablespoon of butter into each hot potato first and let it melt. Then top with sour cream, shredded cheddar cheese, crumbled bacon, chopped chives, and a crack of black pepper. Serve immediately while hot.
Notes
- Russet potatoes work best for baking because of their high starch content, which creates the fluffiest inside.
- Do not wrap the potatoes in foil. Foil traps steam and makes the skin soggy instead of crispy.
- Leftover baked potatoes keep in the fridge for up to 4 days and can be reheated in the oven at 350°F for about 20 minutes.
Frequently Asked Questions
Q: Can I bake potatoes in an air fryer instead of the oven?
A: Yes, air fryers work great for baked potatoes. Set the air fryer to 400°F and cook for about 35 to 40 minutes, flipping halfway through. The circulating hot air creates an even crispier skin than a standard oven. Just make sure to oil and salt the outside and poke holes the same way.
Q: Why is my baked potato still hard in the middle?
A: The potato probably needed more time in the oven. Larger potatoes can take up to 75 minutes at 400°F. Always test doneness by inserting a knife into the center. If there is any resistance, give it another 10 to 15 minutes before checking again.
Q: Is it safe to eat the skin of a baked potato?
A: Absolutely. The skin is completely edible and is one of the best parts when prepared correctly. Scrubbing the potato well before baking removes any dirt. Coating the skin with oil and salt before baking turns it crispy and delicious.
Q: Can I prepare baked potatoes ahead of time for a party?
A: Yes. Bake the potatoes fully, then wrap them individually in foil to keep warm for up to an hour. For longer storage, refrigerate them and reheat in a 350°F oven for 20 minutes before serving. Set up a topping bar so guests can load their own.
