

Those warm, garlicky breadsticks from Olive Garden have a special way of disappearing before your main course even arrives. Making them at home might sound tricky, but it’s actually easier than you’d think. With just seven basic ingredients and no fancy equipment needed, you can create breadsticks that taste even better than the restaurant version. The best part? You control how many you make, and trust me, you’ll want extras because these things vanish fast once they hit the table.
The secret is in the bread flour
When you’re standing in the baking aisle wondering if all-purpose flour will work, here’s the thing about bread flour that makes a real difference. Bread flour has more protein than all-purpose, which creates those tall, puffy breadsticks with that perfect chewy texture everyone loves. You can absolutely use all-purpose flour if that’s what you have, but your breadsticks might come out softer and less chewy than the restaurant version.
The higher protein content in bread flour helps develop more gluten when you knead the dough, giving your breadsticks that satisfying texture. If you do swap in all-purpose flour, you’ll need to knead the dough a bit longer to get similar results. Either way, you’re getting homemade breadsticks that blow away anything from a chain restaurant. Just measure your flour correctly using the spoon-and-level method if you don’t have a kitchen scale, because too much flour makes dense, heavy breadsticks nobody wants.
Getting the water temperature right matters more than you think
Water temperature trips up a lot of people when they’re making bread at home. Too hot and you’ll kill the yeast, which means flat breadsticks that never rise. Too cold and your dough takes forever to proof, if it rises at all. The sweet spot is between 100°F and 110°F, which feels warm but not hot when you test it on your wrist, kind of like bath water for a baby.
If you don’t have a thermometer, just run your tap until the water feels comfortably warm. When you mix it with the yeast and sugar, let it sit for about 10 minutes until it gets foamy and bubbly. That foam tells you the yeast is alive and ready to work. No foam means your water was probably too hot or your yeast was old. The yeast needs that little bit of sugar to activate properly, and it also makes the breadsticks slightly softer and more tender without tasting sweet at all.
Instant yeast vs active dry yeast confusion
The yeast section at the grocery store can be confusing with all the different types. Instant yeast, also called rapid rise or quick rise, is the easiest option because you can add it right into your dry ingredients without any extra steps. Most recipes use instant yeast these days because it saves time and still gives great results for breadsticks and other baked goods.
But if you only have active dry yeast sitting in your fridge, don’t worry. You can swap it in at the same amount, but your dough will take about 20 percent longer to rise. Some people like to proof active dry yeast first by mixing it with the warm water and a pinch of sugar, then waiting five minutes until it bubbles. This step isn’t strictly necessary anymore with modern active dry yeast, but it does speed things up a bit and gives you peace of mind that your yeast is working before you add all your other ingredients.
Kneading by hand works just fine
Not everyone owns a stand mixer, and that’s completely okay for this recipe. Kneading dough by hand takes more elbow grease, but it’s actually pretty satisfying once you get into a rhythm. You’ll need to knead for about 15 to 20 minutes by hand, compared to just 10 minutes in a stand mixer. The dough should feel smooth and elastic when it’s ready, not sticky or rough.
There’s a simple test called the windowpane test that tells you when you’re done kneading. Take a small piece of dough and gently stretch it between your fingers. If you can stretch it thin enough to see light through it without tearing, the gluten is properly developed and your dough is ready. If it tears right away, keep kneading for another minute or two and test again. Getting this right means your breadsticks will hold their shape and have that perfect chewy texture instead of turning into sad, flat sticks in the oven.
Making these breadsticks ahead saves dinner time
Planning ahead makes weeknight dinners so much easier, and breadstick dough is surprisingly flexible about timing. After your first rise, you can shape the breadsticks and stick them in the fridge for up to 24 hours before baking. The cold temperature slows down the yeast, which actually develops more taste in the dough. Just bring them back to room temperature while your oven preheats, and if they haven’t doubled in size yet, let them sit out until they do.
For even longer storage, freeze the shaped breadsticks on a baking sheet until solid, then transfer them to a freezer bag where they’ll keep for up to two months. When you’re ready to bake, put the frozen breadsticks on a parchment-lined tray and let them thaw and rise at room temperature before baking normally. You can also freeze already-baked breadsticks and reheat them at 425°F for about five minutes. They taste fresh-baked when you brush them with garlic butter right before serving.
Shaping breadsticks doesn’t need to be perfect
After your dough doubles in size, punch it down and dump it onto a clean counter without any flour. Using a bench scraper or sharp knife, divide the dough into 12 equal pieces. If you want them all the same size, weigh each piece to about 57 grams, but honestly, nobody will notice if one breadstick is slightly bigger than another. Roll each piece against your counter until it forms a log about 8 inches long.
The rolling motion is easier than it sounds. Just use both hands and roll the dough back and forth with gentle pressure, moving your hands from the center outward. The dough naturally stretches into a log shape. Don’t stress if they’re not perfectly round or exactly the same length. Once they bake up golden brown and get brushed with that garlic butter, any little imperfections add to the homemade charm. Place them about two inches apart on your baking sheet and let them rise again until doubled, which takes another hour or so depending on your kitchen temperature.
That garlic butter topping makes all the difference
Plain breadsticks are fine, but that garlic butter brushed on right when they come out of the oven transforms them into something special. Mix melted butter with garlic powder and a pinch of salt, and brush it on generously while the breadsticks are still piping hot. The butter soaks right into the bread, making every bite rich and garlicky. Some recipes add fresh parsley too, which looks nice and adds a little freshness.
Don’t skimp on the butter here. The restaurant version is definitely not shy about butter, and that’s part of what makes them so addictive. You want to brush the breadsticks as soon as they come out of the oven, maybe even twice if you have extra garlic butter left over. The heat helps the butter soak in instead of just sitting on top. Store any leftover breadsticks in an airtight container for up to three days, and reheat them at 425°F for a few minutes. You can brush them with more garlic butter when reheating to refresh that just-baked taste.
Doubling the recipe requires a bigger mixer
When you’re feeding a crowd, doubling this recipe seems like the obvious move. But before you dump twice the ingredients into your stand mixer, check the size of your bowl. Most home mixers are five or six quarts, and a double batch of dough might be too much for smaller models to handle. The motor can overheat, and the dough won’t knead properly if the bowl is too full.
If you have a six-quart or larger mixer, go ahead and double everything. For smaller mixers, it’s actually faster and easier to make two separate batches. While the first batch rises, you can mix up the second one. This way you’re not risking your mixer or ending up with poorly kneaded dough. Plus, you can stagger the baking so you have fresh, hot breadsticks coming out of the oven throughout dinner. Nothing beats warm breadsticks straight from the oven, and your family will think you’re amazing when you keep bringing out more.
What to serve alongside homemade breadsticks
These breadsticks pair with pretty much anything, but they really shine with Italian-style meals. A big bowl of pasta with marinara sauce and some breadsticks for dipping is classic for a reason. They also go great with soups, especially creamy ones like chicken gnocchi or zuppa toscana. The soft, buttery bread soaks up soup perfectly without falling apart in your bowl.
A simple side salad rounds out the meal nicely, and you can even make a copycat Olive Garden salad with Italian dressing if you want the full restaurant experience at home. Some people like serving breadsticks with cheese dips or spinach artichoke dip for parties. They’re also surprisingly good with breakfast eggs and bacon, though that garlic butter might be a bit much first thing in the morning. Really, these breadsticks work anytime you want something warm and comforting on the table. They make regular weeknight dinners feel a little more special without requiring hours of work in the kitchen.
Making restaurant-quality breadsticks at home is way more manageable than most people think. With basic ingredients and a couple hours for rising time, you can create something that honestly tastes better than the chain restaurant version. The house smells amazing while they bake, and watching your family devour them hot from the oven makes the effort totally worth it. Once you nail this recipe, those breadsticks become your secret weapon for impressing dinner guests or just making Tuesday night dinner feel special.
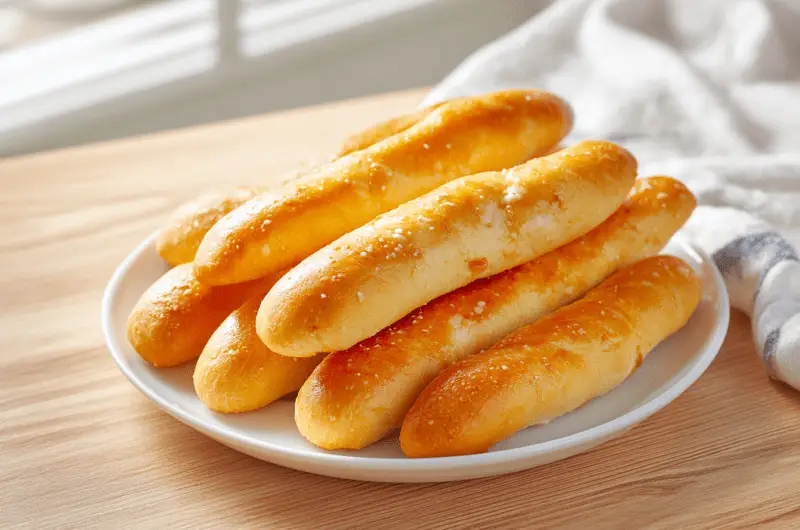
Copycat Olive Garden Breadsticks
Course: Side DishCuisine: Italian12
breadsticks30
minutes14
minutes180
kcalSoft, buttery breadsticks with garlic butter that taste even better than the restaurant version and disappear in minutes.
Ingredients
1 cup plus 2 tablespoons (250 grams) warm water, about 100-110°F
1 1/2 teaspoons instant yeast
2 tablespoons (25 grams) granulated sugar
3 tablespoons (42 grams) unsalted butter, melted
1 3/4 teaspoons fine sea salt
3 cups (381 grams) bread flour, plus more as needed
2 tablespoons (28 grams) unsalted butter, melted (for topping)
1/2 teaspoon kosher salt (for topping)
1/4 teaspoon garlic powder (for topping)
Directions
- Prepare two baking sheets by lining them with parchment paper and set aside. In the bowl of a stand mixer fitted with a dough hook attachment, combine the warm water, yeast, sugar, melted butter, and salt. Stir briefly to combine all the wet ingredients.
- Begin to gradually add the flour while the mixer runs on low speed, adding about one cup at a time. Increase the speed to medium and knead the dough for about 10 to 15 minutes, or until it becomes tacky and very elastic. If the dough feels extremely sticky and won’t form a ball, add more flour one tablespoon at a time until it comes together.
- Remove the dough from the mixer bowl and shape it into a smooth ball. Place the dough in a lightly oiled mixing bowl, turning it once to coat all sides with oil. Cover the bowl tightly with plastic wrap and let the dough rest in a warm, draft-free location until it doubles in size, about 1 to 1 1/2 hours depending on your kitchen temperature.
- Once the dough has doubled in size, gently press it down to deflate it slightly. Turn the dough out onto a clean work surface without adding any flour. Use a bench scraper or sharp knife to divide the dough into 12 equal portions, weighing each piece to about 57 grams if you want them perfectly uniform.
- Roll each piece of dough into a log about 8 inches long, using both hands and rolling from the center outward with gentle, even pressure. Place the shaped breadsticks on your prepared baking sheets, spacing them about 2 inches apart. Cover the baking sheets loosely with plastic wrap or a clean kitchen towel and let the breadsticks rise until doubled in size, about 1 to 1 1/2 hours.
- While the breadsticks are completing their final rise, preheat your oven to 400°F. Once the oven reaches temperature and the breadsticks have doubled in size, bake them for 12 to 14 minutes, or until they turn a light golden brown color. The breadsticks will continue to brown slightly after removing them from the oven, so don’t over-bake them.
- While the breadsticks bake, prepare the garlic butter topping by melting 2 tablespoons of butter and mixing it with the garlic powder and kosher salt in a small bowl. As soon as the breadsticks come out of the oven, immediately brush them generously with the garlic butter mixture while they’re still piping hot.
- Serve the breadsticks warm for the best taste and texture. To refresh leftover breadsticks, place them on a baking sheet and reheat in a 425°F oven for 4 to 5 minutes until warmed through. You can brush them with additional garlic butter and sprinkle with garlic powder and salt before serving if desired.
Notes
- If you only have all-purpose flour, you can substitute it at the same amount, but expect a softer texture and plan to knead the dough a bit longer to develop the gluten properly.
- Active dry yeast can replace instant yeast at a 1:1 ratio, but your rise time will be about 20 percent longer. You can proof it first in the warm water with a pinch of sugar for 5 minutes to speed things up.
- To make ahead, shape the breadsticks after the first rise and refrigerate them covered for up to 24 hours. Bring to room temperature before baking, allowing extra time if needed for them to double in size.
- Freeze shaped unbaked breadsticks on a baking sheet until solid, then store in a freezer bag for up to 2 months. Thaw at room temperature and let rise until doubled before baking as directed.
- Baked breadsticks can be frozen in an airtight container for up to 2 months. Thaw and reheat at 425°F for 4 to 5 minutes, brushing with fresh garlic butter if desired.
Common questions about making breadsticks
Q: Can I make these breadsticks without a stand mixer?
A: Absolutely! You can knead the dough by hand for about 15 to 20 minutes until it’s smooth and elastic. The windowpane test will tell you when it’s ready – stretch a small piece of dough between your fingers, and if you can see light through it without tearing, you’re done kneading. It’s more of a workout, but plenty of people make great breadsticks without any special equipment.
Q: Why didn’t my breadsticks rise?
A: The most common reason is water that was too hot and killed the yeast, or yeast that was old and no longer active. Make sure your water is between 100°F and 110°F, and check the expiration date on your yeast. If your kitchen is cold, the dough will take longer to rise, so find a warm spot like near the stove or in an oven with just the light on.
Q: Can I use olive oil instead of butter in the dough?
A: Yes, you can swap olive oil for the melted butter in the dough itself at the same amount. Several people have had success with this substitution. For the topping, butter works best because it soaks into the hot breadsticks better, but you can experiment with olive oil there too if needed.
Q: How do I store leftover breadsticks?
A: Keep them in an airtight container at room temperature for up to 3 days. To refresh them, pop them in a 425°F oven for 4 to 5 minutes until warmed through. You can also freeze baked breadsticks in an airtight container for up to 2 months, then thaw and reheat the same way. Brush with fresh garlic butter after reheating for the best results.